Business Electronics Recycling in Dacula Georgia: A Guide

Old laptops in a locked closet. Retired desktop towers under a workbench. A server room refresh that left racks of drives, switches, and UPS units waiting for a decision nobody wants to own. That’s how most first major disposal projects start in Dacula.
For a facility manager or IT director, the hard part usually isn’t identifying what’s obsolete. It’s deciding how to move it out without creating a data breach, a compliance issue, or a messy pickup day that disrupts operations. Business electronics recycling in Dacula Georgia isn’t the same as calling a junk hauler to remove household clutter. Commercial projects involve chain of custody, asset tracking, data-bearing devices, and in many cases, lab equipment that requires decontamination before anyone touches it.
If you’re managing a clinic, school, research lab, office, warehouse, or local government site, the safest approach is to treat electronics disposal as an operational project, not a cleanup task.
The E-Waste Challenge for Businesses in Dacula
Dacula businesses are dealing with a local waste stream that’s surprisingly large. Dacula, Georgia generates approximately 163,020 pounds of electronic waste annually, and only about 15% of that, roughly 24,453 pounds, is properly recycled, leaving over 138,567 pounds at risk of improper disposal. For a business owner or department lead, that matters because improper handling rarely stays an environmental issue. It turns into a records issue, a legal issue, or a site safety issue.
What usually gets overlooked is how different commercial e-waste is from residential junk. A broken television in a garage is one thing. A batch of office desktops with employee files, a medical printer with patient records, or a lab instrument connected to regulated workflows is another. Those assets can contain storage media, licensed software, network settings, and operational history that shouldn't leave your site casually.
Why local businesses get stuck
Most first-time projects stall for the same reasons:
- No clear owner: IT assumes facilities will handle removal. Facilities assumes IT will sign off on the data side.
- Mixed inventory: Servers, monitors, desktop PCs, tablets, printers, lab devices, cables, and accessories are all piled together.
- Unclear compliance exposure: The team knows some devices hold sensitive data, but not which ones.
- Wrong vendor category: Residential-oriented haulers can remove items, but they usually aren't set up for auditable data destruction, staged pickups, or lab-related handling.
That gap is why many organizations start searching for county-specific help such as business electronics recycling services in Gwinnett County. They’re not looking for basic hauling. They’re looking for a disposal process they can defend if leadership, auditors, or legal ever ask what happened to the assets.
Practical rule: If your equipment ever stored protected data, connected to your network, or supported regulated operations, disposal belongs in the same risk category as any other compliance-controlled process.
What a business should actually optimize for
The right target isn’t “get rid of it fast.” It’s this:
- Secure removal of data-bearing and regulated equipment.
- Documented handling from pickup through final processing.
- Operational efficiency so the project doesn’t consume your team for weeks.
- Responsible downstream recycling instead of vague disposal promises.
For Dacula organizations, the problem is common enough to be routine, but the stakes are still high. If you approach it like a business process from the start, the project becomes manageable.
Building Your Compliant Disposal and Inventory Strategy
A good disposal project starts before the first pallet is wrapped. The strongest programs begin with an internal inventory audit, and organizations that use a step-by-step methodology beginning with comprehensive inventory audits achieve superior environmental outcomes and stronger compliance, with leadership accountability reducing risks by up to 40%. That’s the difference between a controlled disposition project and a rushed cleanout.
The first document you need isn’t a pickup request. It’s an asset disposition list.
Start with an inventory that separates risk from scrap
Don’t build one giant spreadsheet called “electronics.” Break the inventory into practical groups your team can act on:
- User devices: laptops, desktops, tablets, docking stations, mobile devices
- Infrastructure: servers, network switches, firewalls, storage arrays, rack equipment
- Peripherals: monitors, printers, scanners, phones, keyboards, cables
- Data media: hard drives, SSDs, backup tapes, removable media
- Lab and technical equipment: analyzers, centrifuges, incubators, balances, microscopes, control units
The categories matter because each one has a different handling path. A monitor doesn’t trigger the same concerns as a laptop. A centrifuge doesn’t move like a printer. A retired firewall can contain configuration data even if nobody has logged into it in years.
If your team needs a model for organizing the workstream, use an IT asset disposal framework that accounts for identification, segregation, security review, and final disposition. A practical reference point is this IT asset disposal process.
A clear visual helps when you're aligning facilities, IT, compliance, and procurement on the same process.
Identify what falls under compliance controls
Many organizations often make avoidable mistakes. They look only for obvious computers and miss everything else with memory or storage.
Review assets for any of the following:
- Protected health information exposure: exam room PCs, nurses’ station devices, label printers, imaging workstations, external drives
- Financial or employee data: HR desktops, accounting laptops, payroll printers, shared office copiers
- Research or institutional data: lab controllers, acquisition computers, departmental file servers
- Embedded storage: multifunction printers, medical devices, network appliances, test equipment with onboard memory
“If you can’t say with confidence whether a device stores data, handle it as if it does until verified otherwise.”
That simple rule prevents the most common disposal failure. Teams often assume a device is “just hardware” because it isn’t a laptop. In practice, many business systems store logs, scans, credentials, or local records.
Build the disposition plan before you schedule removal
Once inventory is complete, assign each asset to one of four outcomes:
| Disposition path | Best fit |
|---|---|
| Reuse internally | Working equipment still aligned with business needs |
| Redeploy after sanitization | Functional devices moving to a lower-risk role |
| Recycle | Obsolete or low-value equipment with no reuse path |
| Destroy media | Drives or media that require physical destruction |
That planning step prevents confusion on pickup day. It also protects value. If you send everything straight to destruction, you may be eliminating reuse or remarketing options that would have made sense for selected assets. On the other hand, if you try to resell everything, you’ll waste time processing equipment that has no practical recovery path.
Assign responsibilities inside your organization
A compliant strategy needs named owners. Keep it simple:
- IT confirms which assets contain data and whether sanitization is acceptable.
- Facilities manages access, loading conditions, staging space, and building coordination.
- Compliance or leadership approves the final disposition rules.
- Department managers verify no active assets are mixed into the surplus lot.
Operational advice: Put one person in charge of the final release list. Shared ownership sounds collaborative, but it often creates pickup delays and disputed asset counts.
The companies that run these projects well don’t rely on memory or hallway conversations. They create a short, written workflow and use it every time. That discipline is what keeps electronics recycling from turning into an internal fire drill.
Data Security Demystified Sanitization Versus Shredding
Most organizations don’t struggle with the idea of destroying data. They struggle with choosing the right method for each device. The answer isn’t “always wipe” or “always shred.” It depends on the asset, its condition, and the level of assurance you need.
For business electronics recycling in Dacula Georgia, the two main paths are data sanitization and physical shredding. For data-heavy assets, DoD 5220.22-M 3-pass wiping meets HIPAA standards for data sanitization, while shredding offers over 95% data destruction efficacy for end-of-life media. The same source notes that illegal exports can account for 20-30% of U.S. e-waste, which is one reason certified downstream handling matters.
What sanitization is good at
Sanitization works best when the device is functional and the drive can still be accessed. A proper DoD 5220.22-M 3-pass wipe overwrites the data in a controlled way so the asset can move to reuse, resale, or recycling without carrying recoverable business information.
That makes sanitization the practical choice for:
- Working desktops and laptops
- Servers being decommissioned in an orderly refresh
- Storage devices that still respond normally
- Fleet equipment with reuse or value recovery potential
It also preserves flexibility. If a drive can be sanitized and documented, the hardware may still have downstream value instead of being reduced immediately to scrap.
There’s a related point worth making. Internal resets are not the same thing as compliant sanitization. For example, consumer troubleshooting steps like fixing HP issues with a reset can restore usability for an individual machine, but a factory reset is not a substitute for documented enterprise data destruction.
When shredding is the right call
Shredding is the stronger option when a drive is failed, inaccessible, obsolete, or too sensitive to release through a wipe-and-redeploy path. It’s often the right answer for damaged SSDs, dead hard drives, old backup media, and any storage removed from highly regulated environments where your policy requires physical destruction.
Use shredding when:
- The media won’t power on or can’t be read
- The drive is leaving a highly sensitive environment
- The organization wants finality over recoverable asset value
- Chain-of-custody expectations are strict and simple destruction is easier to defend
Some organizations overcomplicate this decision. If the media is unreadable or your policy requires zero ambiguity, shred it.
If your process requires audited handling of media from collection through final destruction, the key is choosing a provider that offers secure data destruction services with documented custody and final certificates.
Data Sanitization vs. Physical Shredding at a Glance
| Attribute | Data Sanitization (DoD 5220.22-M Wipe) | Physical Shredding |
|---|---|---|
| Best use case | Functional drives in reusable equipment | Failed, obsolete, or highly sensitive media |
| Asset value | Preserves potential reuse or resale path | Eliminates reuse of the media |
| Security method | Software overwrite process | Physical destruction of the device |
| Documentation need | Wipe records and destruction or recycling follow-up | Destruction records and chain of custody |
| Operational trade-off | Requires readable media and process control | Faster final disposition for unsuitable media |
How to decide in the real world
A useful decision rule is to evaluate each asset through three questions:
- Does it contain data or likely contain data?
- Is the media functional enough to sanitize?
- Does policy permit reuse after sanitization, or require physical destruction?
If the answer to the second question is no, sanitization isn’t your path. If the answer to the third is destruction, don’t waste time debating residual value. Follow policy and document it.
Businesses often get into trouble with generic haulers. Removal is easy. Defensible data handling is harder. If your disposal partner can’t explain the difference between wiping and shredding, or can’t document which path was used for which assets, the risk hasn’t been managed. It has only been moved off-site.
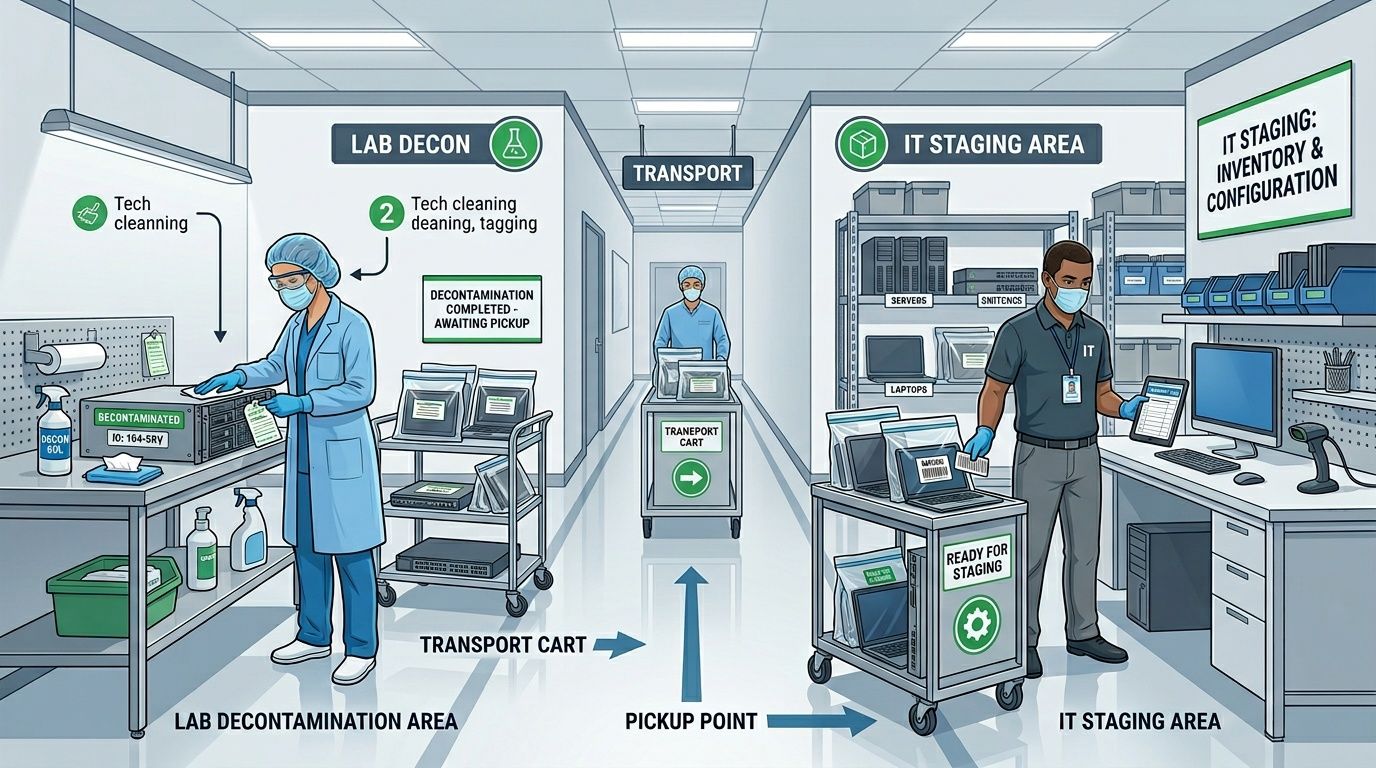
Preparing for Pickup From Lab Decontamination to IT Staging
Pickup day goes smoothly when the site is prepared with intention. It falls apart when equipment is scattered across offices, nobody has building access arranged, and regulated assets haven’t been cleared for handling. The prep work is different for lab equipment than for standard IT gear, and treating them the same creates delays.
Lab equipment needs decontamination clearance
If a device was used in a laboratory, clinic, testing space, or research environment, don’t assume a recycler can roll it out. Equipment that may have been exposed to biological, chemical, radiological, or other hazardous materials must be properly decontaminated before transport.
That includes items such as:
- Centrifuges and incubators: internal chambers may need clearance
- Fume hoods and ducted equipment: residue concerns can affect handling
- Analyzers and benchtop systems: sample contact areas matter
- Cold storage and specialized units: spills, contamination, or retained materials must be addressed
A formal decontamination workflow protects your staff and the pickup crew. It also prevents a common project failure, where equipment is listed for removal but can’t be loaded because nobody signed off on its condition. If your site handles lab assets, follow a documented equipment sterilization and decontamination process before the pickup window.
Site rule: No certificate, no move. If lab equipment hasn’t been cleared for safe handling, it shouldn’t enter the loading stream.
IT equipment needs consolidation and separation
Standard office and server equipment is simpler, but it still needs staging discipline. Don’t leave the crew to collect devices one by one from cubicles, storage closets, and locked offices. Consolidate the load into a staging area with clear access.
A solid setup usually includes:
- Separated categories: keep laptops, desktops, monitors, printers, and loose drives in distinct groups.
- Labeled pallets or gaylords: note whether the load contains data-bearing devices.
- Rack awareness: identify equipment that requires de-installation instead of simple removal.
- Accessory control: cables, docking stations, keyboards, and power supplies should be boxed, not loose.
This workflow is what a prepared site looks like in practice.
What to do the day before pickup
The most effective teams run a short pre-pickup checklist. Not a long one. Just enough to remove avoidable friction.
- Confirm asset release: department heads should verify that nothing in the load is still in service.
- Clear the route: elevators, loading docks, and security checkpoints need to be available.
- Protect paperwork: keep your internal inventory and any decontamination documents ready for handoff.
- Flag special handling items: oversized lab units, server racks, and fragile instruments should be identified in advance.
One more point matters here. If you want chain of custody to be credible, don’t let surplus equipment sit unattended in hallways for days before removal. Stage it in a controlled room when possible, especially if storage media is still installed.
Common prep mistakes that slow the project
A few errors show up repeatedly:
| Mistake | Why it causes trouble |
|---|---|
| Mixing live and retired assets | Increases the chance of removing equipment still needed by staff |
| No decontamination record for lab devices | Prevents safe loading and can stop the job |
| Loose drives tossed into boxes | Breaks asset tracking and raises data handling concerns |
| Unplanned building access | Delays crews and extends site disruption |
Good staging doesn’t just help the recycler. It helps your own team finish the project with fewer interruptions, fewer questions, and cleaner documentation afterward.
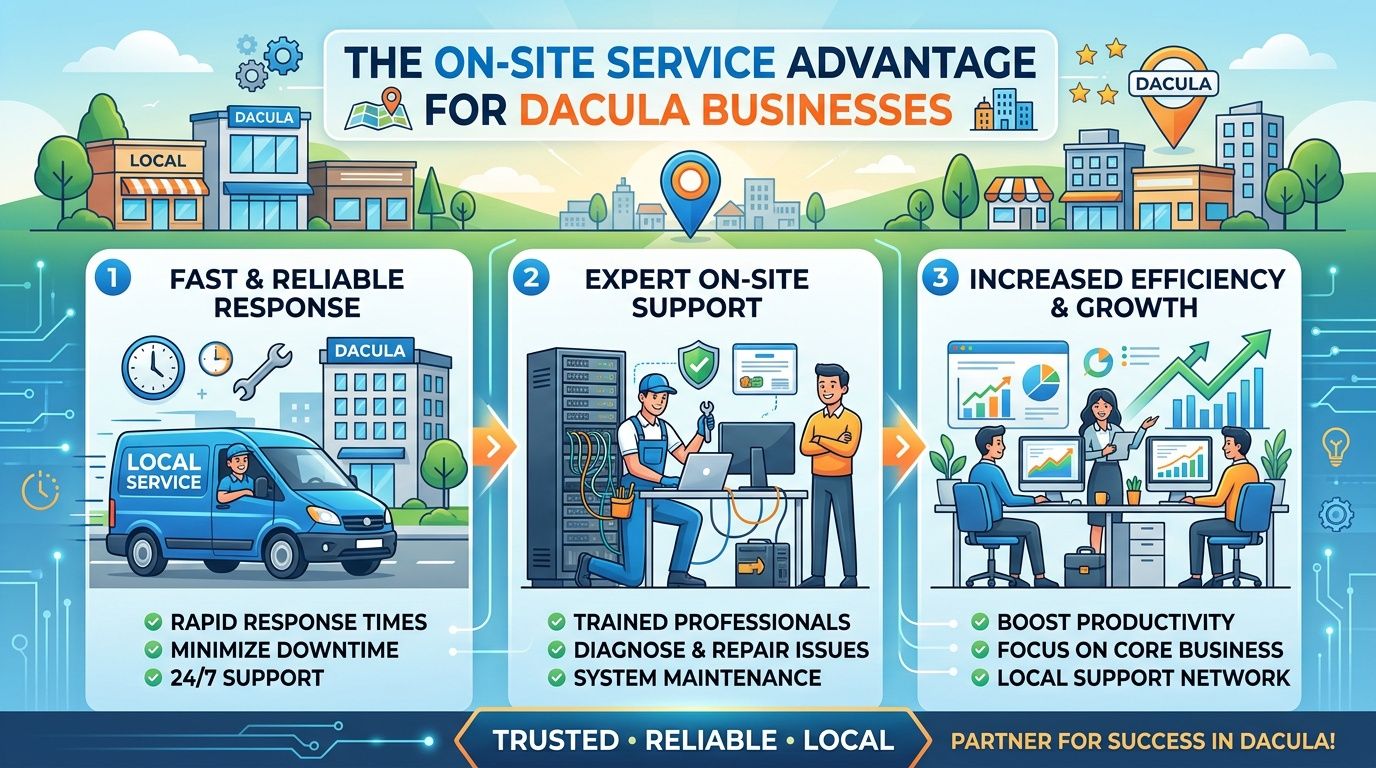
The On-Site Service Advantage for Dacula Businesses
For commercial electronics disposal, on-site service isn’t a luxury. It’s often the only workable model. Businesses in Dacula don’t need a vendor that only says “drop it off” or shows up with a generic hauling crew. They need a team that can remove equipment from active workplaces, manage secure transport, and keep the project organized from the first item lifted to the last asset logged.
That matters because current search results in the area still skew toward residential-style options. Current Dacula recycling search results reveal a gap for enterprise-level needs, often pointing to junk haulers that lack transparent pricing, proof of R2/RIOS certification, and audited data destruction processes crucial for HIPAA and GLBA compliance.
What on-site service solves
A proper on-site program addresses problems that office staff can’t solve by themselves:
- De-installation: rack-mounted gear, large printers, lab units, and built-in equipment need technical removal.
- Packing and handling: fragile and awkward devices require more than a dolly and a pickup truck.
- Chain of custody: assets should be controlled from the moment they leave your room, closet, lab, or server area.
- Minimal disruption: business operations still need to continue while the removal happens.
For facilities with loading docks, freight elevators, badge access, and occupied work areas, this becomes a logistics exercise. A capable team plans routes, staging, timing, and labor before arriving.
This is the advantage in visual form.
Why generic hauling breaks down fast
A junk hauler can remove volume. That’s not the same as managing an auditable business disposal project.
Here’s where the gap usually shows:
- No asset-level coordination: they load what’s there, but they don’t align the load with your release list.
- No security protocol: data-bearing assets are treated like scrap metal.
- No specialized handling: server cabinets, instruments, and sensitive media aren’t managed differently.
- No documentation depth: the removal may be complete, but your records are weak.
If your legal, compliance, or executive team would ask for proof after the fact, choose the vendor as if that question has already been asked.
What a well-run on-site visit looks like
On a disciplined project, the service team arrives with the job already mapped out. They know what requires de-installation, what’s staged for direct loading, what has special handling requirements, and who signs off on release.
The strongest outcomes usually come from these practices:
- Pre-arrival coordination with the site contact so nobody is searching for rooms or access cards.
- Controlled loading that keeps data-bearing and specialty assets in the right handling stream.
- Consistent custody records so the handoff from your site is clear.
- Purpose-built transport rather than improvised hauling.
For Dacula-area organizations, that’s the operational difference between “someone took the stuff away” and “the disposition project is complete, documented, and defensible.”
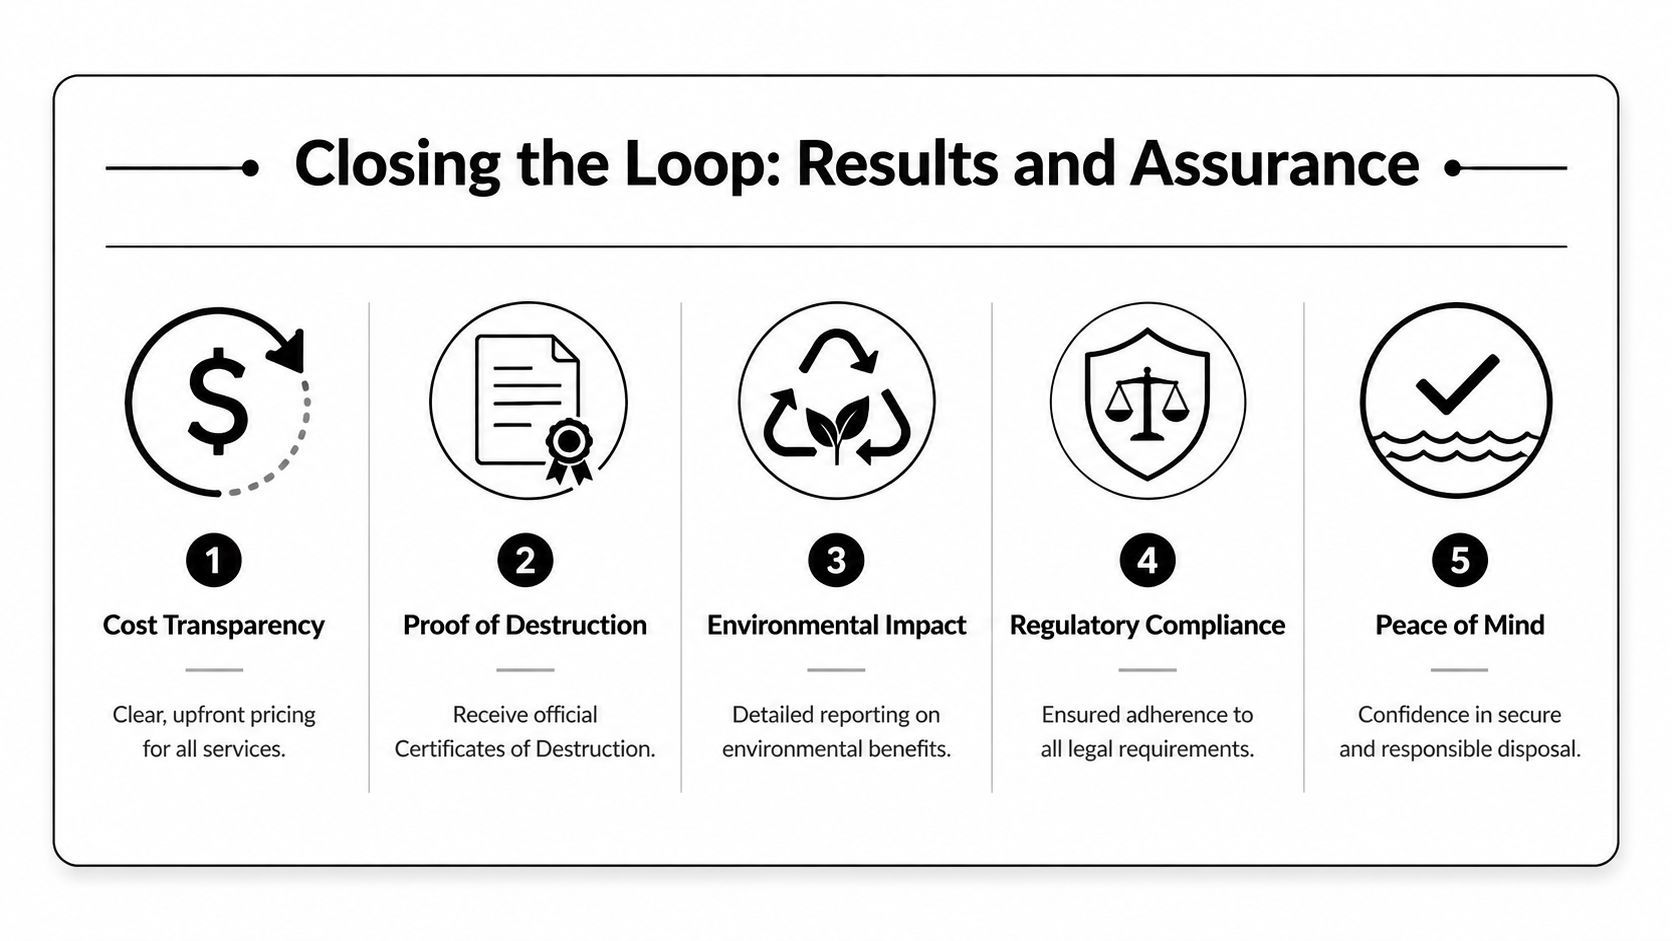
Closing the Loop Costs Documentation and Real-World Scenarios
By the end of a recycling project, most organizations want answers to three questions. What did this cost? What proof do we have? Did we handle the right assets the right way? Those are the questions that matter after the truck leaves.
Cost usually depends on the mix of assets, the amount of labor required for de-installation, whether lab decontamination issues are involved, and how much sorting or packing the recycler must perform on site. A clean, staged load is usually easier to process than a mixed, scattered one. Heavy specialty equipment takes more planning than a pallet of office monitors. Data-bearing devices may also require a tighter documentation path than general peripherals.
The documents that matter after pickup
For business electronics recycling in Dacula Georgia, documentation is what turns a completed pickup into a completed compliance record.
Look for paperwork such as:
- Certificate of destruction: confirms media or assets were destroyed under the agreed process
- Certificate of recycling: shows the material entered a recycling stream rather than informal disposal
- Asset manifest or pickup log: ties what left your site to what was processed
- Decontamination support records: necessary when lab equipment is involved
If your leadership team has never seen one, it helps to review a sample certificate of destruction so everyone understands what acceptable proof should look like before the project begins.
This summary captures the closeout side of the job.
![]()
Real-world scenarios Dacula organizations face
A few examples make the trade-offs clearer.
Hospital or clinic scenario
A medical office has aging registration PCs, label printers, and a retired imaging workstation. The main concern isn’t hauling volume. It’s whether any device that touched patient information receives the right destruction path and paperwork. In that setting, the decision usually starts with identifying all data-bearing equipment, then assigning sanitization or shredding based on policy and asset condition.
University or school lab scenario
A department is clearing a teaching lab with old benchtop instruments, attached computers, and miscellaneous electronics accumulated over multiple budget cycles. The hidden issue is often lab clearance. Some equipment can’t move until the institution confirms it’s safe to handle. The project succeeds when the school separates decontamination signoff from the later transportation step, rather than discovering the issue on pickup day.
Corporate server room scenario
An office or regional data room is replacing rack equipment. Here the risk is chain of custody and de-installation control. Drives, blades, switches, and rails can get separated quickly if the job isn’t organized. The best practice is to map which assets are being removed, identify which drives stay in sanitization versus physical destruction, and keep the manifest aligned with the actual rack pull.
Good closeout documents don’t fix a sloppy project. They confirm that a disciplined project happened.
Questions worth asking before you approve the job
Use these as a quick screening list:
| Question | Why it matters |
|---|---|
| What documentation will we receive after service? | You need auditable proof, not verbal assurance |
| How are data-bearing devices identified and handled? | Prevents general scrap treatment of sensitive assets |
| Can you support lab equipment with decontamination requirements? | Important for hospitals, labs, and schools |
| Do you provide on-site de-installation and pickup logistics? | Reduces internal labor and project delays |
The organizations that finish these projects well don’t just remove obsolete equipment. They close the loop with records strong enough to satisfy operations, compliance, and leadership at the same time.
If you need a practical partner for Scientific Equipment Disposal, the best next step is to request a review of your inventory, your data-destruction requirements, and any lab decontamination constraints before scheduling pickup. That gives your team a clear disposal path, proper documentation, and a project plan built for business electronics recycling rather than residential junk removal.