Lab Laboratory Equipment Disposal Guide for 2026

Before you even think about hauling away surplus lab equipment, you need a solid game plan. It starts with a detailed audit. This isn't just about ticking boxes; it's about building a bulletproof chain of custody for every single asset, from centrifuges to fume hoods.
Getting this right from the start protects your organization from compliance headaches down the road, whether you're a small clinic in Atlanta, a research hub in Boston, or a nationwide institution with facilities across the United States.
Auditing and Staging Your Equipment for Disposal
Think of the initial audit as the foundation for your entire decommissioning project. Without a rock-solid inventory, you have no way to track assets, verify data has been destroyed, or prove you’ve disposed of everything correctly. For any hospital, university, or research facility—from San Diego to Raleigh—this is non-negotiable.
This is more than a simple headcount. You need to capture specific details for each piece of equipment.
- Manufacturer and Model Number: This is key for figuring out specs and whether an item has any resale or recycling value.
- Serial Number and Internal Asset Tag: These are your best friends for creating an auditable trail.
- Condition and Functionality: Is it working, broken, or only good for spare parts? Be honest.
- Physical Location: Note the exact room and building. You need to know where everything is before it gets moved.
Identify and Flag Key Risks
With your master list in hand, the next job is to play detective and flag potential risks. This is where you identify any equipment that needs special handling. For instance, any device that ever touched patient data or proprietary research—like a genetic sequencer or the PC controlling a clinical analyzer—must be tagged for certified data destruction. No exceptions, whether you operate in California or Massachusetts.
You also have to pinpoint anything containing hazardous materials. I've seen it all—older lab equipment can hide things like mercury, lead, or residual biological agents that are heavily regulated by the EPA. Tagging these items upfront ensures your disposal partner knows exactly what they’re dealing with and can manage them according to federal and state law nationwide.
This flowchart maps out the core workflow we use when auditing lab equipment before disposal.
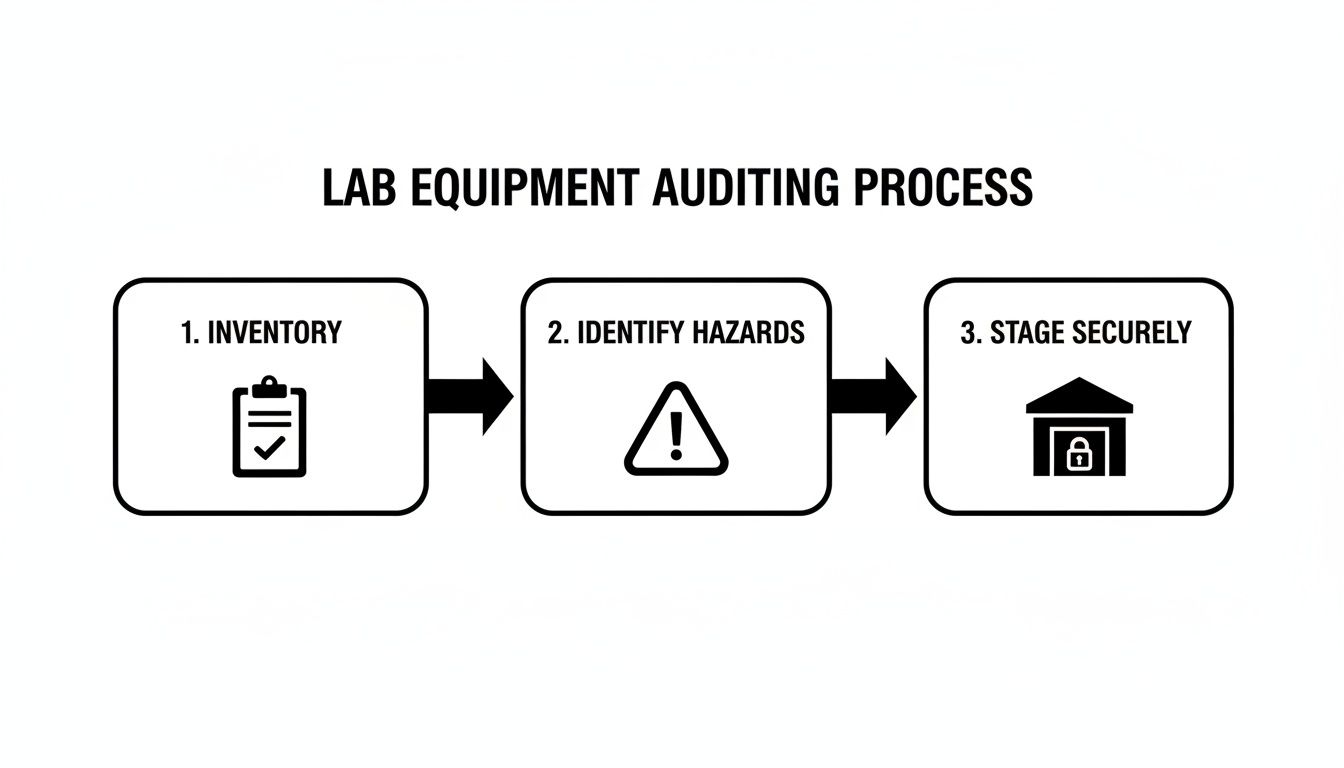
As you can see, the process moves logically from taking inventory and identifying risks to getting everything staged for a secure, organized removal.
To help you get started, here's a quick-reference checklist that covers the initial steps for preparing your lab equipment for disposal.
| Phase | Action Item | Key Consideration |
|---|---|---|
| Inventory | Create a master asset list | Include serial numbers, asset tags, and location. |
| Assessment | Note the condition of each item | Is it functional, non-functional, or for parts? |
| Risk ID | Flag items with data storage | Identify hard drives, solid-state drives, or media. |
| Risk ID | Flag items with hazardous materials | Check for mercury, lead, or biological residues. |
| Logistics | Designate a secure staging area | Choose a location away from active lab operations. |
| This checklist isn't exhaustive, but it will put you on the right track and prevent major oversights during the crucial preparation phase. |
Set Up a Secure Staging Area
Once everything has been audited and tagged, you absolutely need a designated staging area. This should be a secure, out-of-the-way space where all the decommissioned assets can be gathered before your disposal partner arrives for pickup. A well-organized staging area prevents chaos and stops surplus equipment from getting in the way of your daily lab work.
The goal is to create a clear separation between active and decommissioned assets. This prevents accidental use of equipment slated for disposal and streamlines the pickup process for your disposal partner, saving time and reducing disruption.
While you're prepping equipment for pickup, it’s a great time to think about other assets that might need to go. For a more complete picture, you can learn more about the specifics of handling general laboratory and equipment disposal. Getting it all done at once helps keep your facility compliant and organized from start to finish.
Securing Sensitive Data Before Equipment Removal
When you're decommissioning lab laboratory equipment, data security isn't just a box to check—it's a critical step that protects your entire organization. A single forgotten hard drive or an unsanitized memory card can easily lead to a massive data breach, triggering costly HIPAA fines and wrecking your institution's hard-earned reputation. This risk is real, whether you're in a dense research hub like Atlanta or a smaller clinical site in a rural area.
Thinking you can just drag files to the trash bin is a dangerous mistake. That action only removes a file's location marker, leaving the actual data behind and easily recoverable. To truly protect yourself, professional data destruction is the only acceptable path for any facility in the United States.
Why Just Deleting Isn't Enough
Imagine your hard drive is a library and your files are the books. Deleting a file is like throwing out the card from the card catalog—the book is still sitting on the shelf, ready for anyone who knows where to look. Forensic data recovery tools are designed to do just that, easily bypassing the "deleted" pointer to reconstruct the original information.
This isn't just about the main computer in the lab. Modern scientific instruments are loaded with internal storage media that can hold a shocking amount of sensitive data.
- Clinical and Blood Analyzers: These often store batches of patient results, ID numbers, and other protected health information (PHI) on their internal drives.
- DNA Sequencers and Spectrometers: This is where your intellectual property lives. These machines frequently hold proprietary research data that is invaluable to your organization.
- Controlling PCs and Workstations: Don't forget the computers connected to your lab equipment. They act as the central hub for collecting and storing data from multiple instruments.
An oversight here can be catastrophic. Think about a university research lab in North Carolina facing huge fines and public backlash because a disposed-of analyzer still contained a hard drive full of patient data from a clinical trial. This isn't a hypothetical; it's a real-world scenario we help clients avoid every day across the nation.
Demand Verifiable Data Destruction
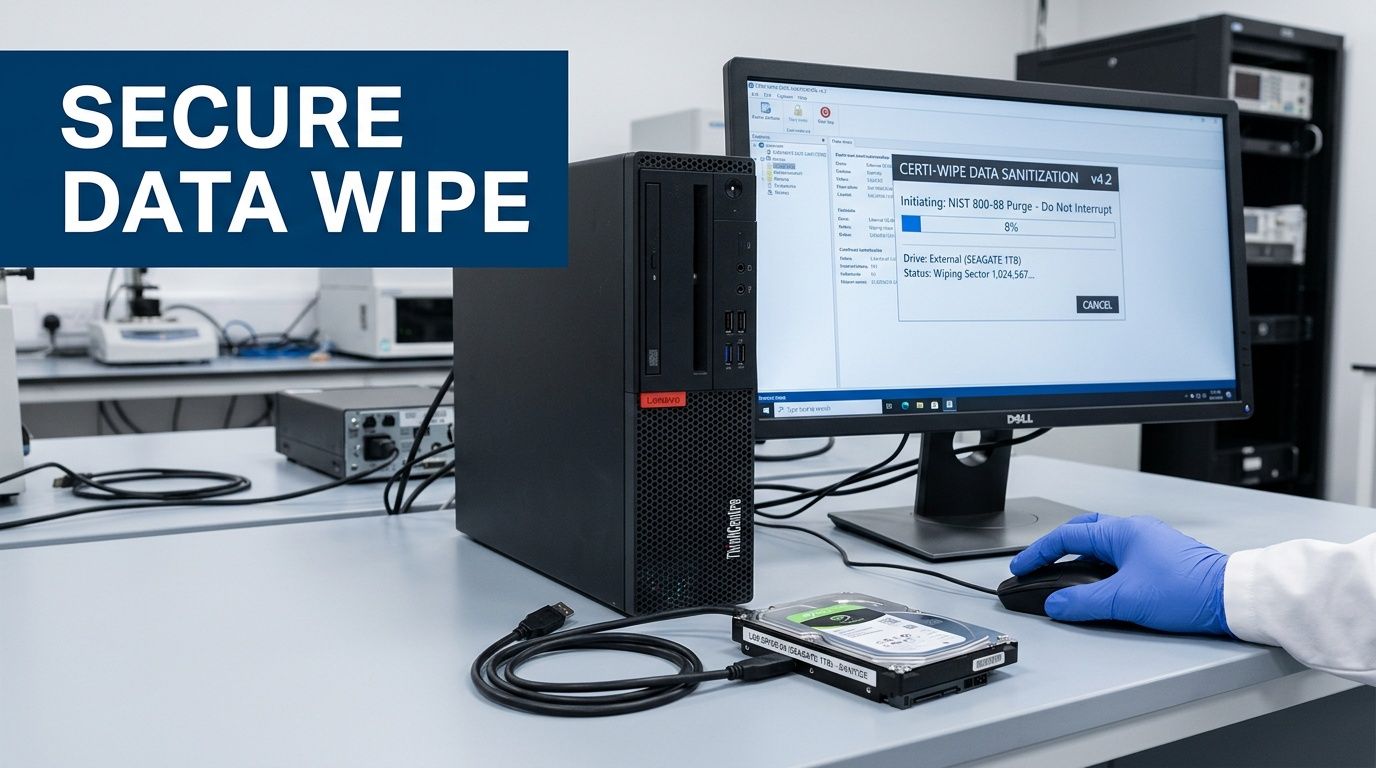
To protect your organization, you must use—and demand proof of—industry-standard data sanitization methods. One of the most recognized is the DoD 5220.22-M standard. This is a 3-pass overwrite method that writes new patterns over the original data three separate times, making it virtually impossible to recover.
When you're vetting a disposal partner, ask them point-blank what data sanitization standard they follow. If they can't give you a clear answer or provide certified proof, that's a major red flag. Your compliance is on the line.
Any qualified vendor will issue a Certificate of Data Destruction for every single drive they process. This document is your official paper trail, proving the data was destroyed in a compliant manner. It's an essential piece of documentation for any future audit. For a closer look at the technical side, our guide on secure data destruction offers a deeper dive.
But what about drives that are too old to wipe or have failed completely? For those, physical destruction is the only answer. This means shredding the drive into tiny, unrecognizable fragments, guaranteeing no data can ever be pulled from it. Both certified wiping and physical shredding are crucial tools for a truly secure lab decommissioning plan.
Managing Hazardous Materials During Decommissioning
Once your data is handled, the next big hurdle is dealing with the hazardous materials often lurking inside your lab laboratory equipment. Getting this wrong can mean serious environmental blowback, health risks for your team, and hefty fines from agencies like the EPA. This part of the process demands a careful, deliberate approach, no matter where your lab is located.
We often see labs underestimate just how many regulated materials are in their older assets. It’s not just about the chemicals you can see; the equipment itself is frequently a source of hazardous waste.
Identifying Common Hazardous Materials
Before your disposal partner shows up, you need to identify and flag any known contaminants. This is crucial for ensuring everyone's safety and proper handling down the line, whether your facility is in a major city or a more remote location.
Here are the usual suspects we run into:
- Mercury: You'll find this in older thermometers, manometers, and certain switches.
- Lead: Common in the cathode-ray tube (CRT) monitors on legacy machines and in the solder on circuit boards.
- Biological and Chemical Residues: Biosafety cabinets, fume hoods, and incubators almost always have residual agents that need full decontamination.
- Asbestos: Some very old ovens and incubators might contain asbestos for insulation.
We saw this firsthand when an Atlanta biotech firm got hit with major cleanup costs. They disposed of several centrifuges without realizing they still held trace biological contaminants. A quick, clear conversation with their disposal partner would have avoided the entire mess.
Your job is to identify and declare these materials. A specialized disposal partner’s responsibility is to handle them in full compliance with state and federal regulations, like the Resource Conservation and Recovery Act (RCRA).
Improper disposal of hazardous materials contributes to 15% of lab-related environmental violations reported by the EPA. A good recycling partner can help divert up to 95% of materials from centrifuges away from landfills, keeping you compliant with rules like RCRA. It helps to read more on the background of lab equipment development to see how manufacturing materials have evolved over the years.
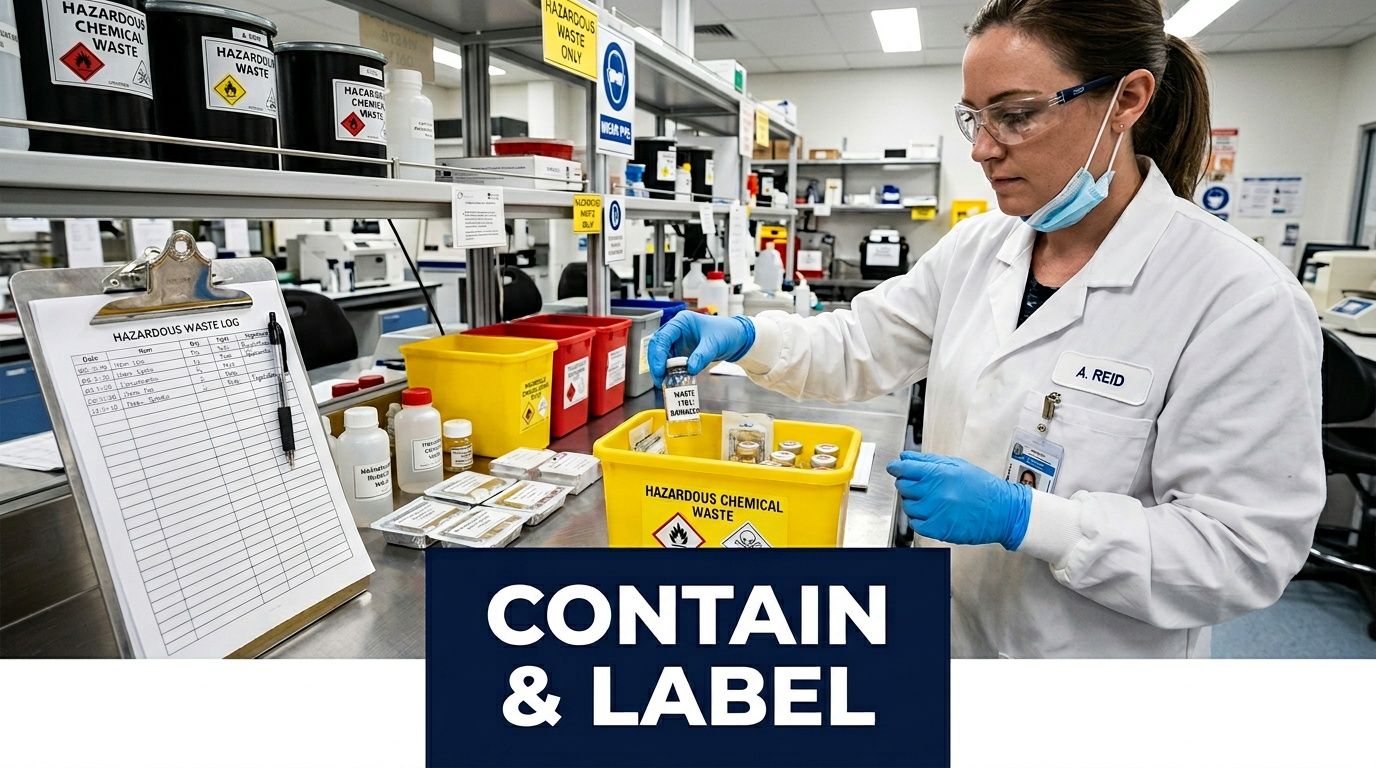
Communicating Hazards to Your Disposal Partner
Clear documentation is your best friend here. After you've flagged potential hazards in your audit, make sure this information is physically marked on the equipment and communicated in writing to your disposal vendor.
Hand them a copy of your inventory that clearly marks every single item that contains or was exposed to hazardous substances.
This simple step is the key to ensuring the safe handling of your lab laboratory equipment, from pickup all the way to final processing. A reputable partner will use that information to properly segregate materials, making sure they are recycled or disposed of responsibly—never just dumped in a landfill. This is a cornerstone of a compliant program, and our guide on EPA-compliant laboratory equipment disposal offers more specifics on the nitty-gritty of regulatory demands.
Getting the Pickup Right: Coordinating On-Site Logistics
The actual, physical removal of your equipment is often where a smooth decommissioning plan can fall apart. This is the moment all the planning becomes action, and you can’t afford disruptions to active research or clinical work. A seamless pickup doesn't just happen; it's the direct result of smart logistical planning, both on your end and with your disposal partner, whether you need services locally in Atlanta or nationwide.
Honestly, your success here comes down to picking the right partner. When you're vetting a company—whether you're in a major hub like San Francisco or a smaller city—ask them point-blank if they run their own fleet of trucks. Using a vendor with their own vehicles gives you far more control over scheduling and means the crew showing up is directly accountable to the company you hired, not some third-party contractor.
Planning for a Smooth On-Site Removal
Before the truck ever shows up, a pre-removal walkthrough is non-negotiable. Get your facilities manager and your disposal partner in the same room and walk the path the equipment will take. The whole point is to spot and solve problems before they happen on pickup day.
Here are the key logistical points you need to iron out:
- Mapping the Route: What’s the clearest path from your lab or staging area to the loading dock? Get out a tape measure. Make sure bulky items like biosafety cabinets or -80°C freezers will actually fit through every doorway and hallway.
- Booking Elevators: If you're in a multi-story building, you’ll need to reserve the freight elevator. My advice? Book it for more time than you think you need. Unexpected delays are common, and you don't want to be caught short.
- Protecting Your Floors: Insist that your vendor lays down masonite or another protective covering. This prevents scuffs, scratches, and damage, especially in high-traffic corridors or sensitive clinical areas.
- Truck Parking and Access: Figure out exactly where the truck will park. It needs to be a secure spot that’s convenient for loading but doesn't block emergency access points or interfere with your facility’s daily traffic.
Getting ahead of these details is what prevents last-minute headaches and keeps the entire removal process moving efficiently.
The true advantage of a full-service disposal partner is that they do all the heavy lifting—literally. An experienced team arrives with their own crew, dollies, pallet jacks, and packing supplies, which frees up your own staff to stay focused on their actual jobs.
How to Minimize Disruption in an Active Facility
Pulling lab equipment out of a working hospital or a bustling research center is a different beast entirely. The work has to be done quietly, quickly, and with almost zero disruption to what’s happening around you. This holds true for labs in dense urban centers like New York City as well as sprawling campuses in Texas.
This is where scheduling is everything. Arranging for pickups during off-peak hours, like evenings or weekends, can be a total game-changer for minimizing impact.
A professional crew gets the unique pressures of these environments. They know how to work efficiently and quietly, always respecting the space and ensuring that patient care or critical experiments aren't disturbed. This focus on seamless execution is especially crucial for larger, more complex projects. You can see how we manage these specialized logistics by exploring our research facility equipment removal services. When you hand over the physical removal to experts, you’re ensuring your assets are handled professionally from the moment they leave your lab.
Your responsibility for that surplus lab equipment doesn't just vanish once our truck pulls away from your facility. In fact, what comes next is one of the most critical parts of the whole process: getting the final documentation in order. This paper trail is your absolute proof that you’ve met all your legal and environmental obligations, protecting your organization from any future headaches.
Think of it this way: without that proof, you have no defense in a compliance audit. For the universities, hospitals, and government agencies we work with from Atlanta to Seattle, a complete and accurate documentation file isn't just a good idea—it's mandatory. It’s the final, official record showing you handled the equipment’s end-of-life responsibly.
The Essential Paperwork for Your Audit File
Once your equipment has been removed and processed, we will provide a set of crucial documents. These aren't just simple receipts; they are legal records that tie directly back to the detailed inventory you created at the beginning of the project.
Here's what you need to look for:
- Certificate of Disposal and Recycling: This is the document that formally transfers liability from your organization to us. It will clearly state that the equipment was handled, recycled, or disposed of according to all local, state, and federal laws.
- Certificate of Data Destruction: For any piece of equipment that held sensitive data—and many modern lab instruments do—this is non-negotiable. It certifies that all media was either wiped clean or physically destroyed, referencing the specific standard used, like DoD 5220.22-M.
- Itemized Asset List: Both of the certificates above should reference the exact serial numbers or asset tags of the equipment they cover. This is what creates that unbreakable chain of custody, linking the paperwork back to the physical assets.
A legitimate certificate from a reputable vendor will never be a generic, one-page document. It has to be detailed and list the specific assets removed from your lab. If a vendor gives you something vague, it's a huge red flag. You should always push back.
For organizations here in Atlanta and across the country, a clear paper trail is your best defense. If you're new to this, looking at a sample Certificate of Destruction can clarify what to expect from a professional disposal partner.
When dealing with equipment that has its own specific set of rules, like medical instruments, it helps to understand the bigger picture of regulatory compliance for medical devices. Knowing this ensures your disposal practices and documentation will stand up to any scrutiny. Ultimately, this complete file proves your commitment to doing things right, protecting both your reputation and your bottom line.
Common Questions About Lab Equipment Disposal
When it comes to getting rid of old lab laboratory equipment, we hear a lot of the same questions from facility managers, EHS coordinators, and lab directors. Whether you’re right here in Atlanta or managing a facility across the country, the stakes are high. Getting it wrong can be costly.
We've handled thousands of lab cleanouts nationwide, so we've put together some straightforward answers to the questions we get asked most.
Can We Mix Lab Equipment with Regular E-Waste?
This one comes up a lot, and the answer is always a hard no. Your standard office e-waste—think monitors, keyboards, and printers—is a completely different beast.
Lab equipment is often contaminated with biological or chemical materials. Even if it's clean, it might hold sensitive research or patient data. Tossing it in with the regular e-waste stream means you skip the decontamination, data sanitization, and specialized handling required by regulations like RCRA and HIPAA.
Imagine treating a biosafety cabinet that’s seen years of use like an old desktop computer. That’s a fast track to serious compliance trouble and potential liability. You have to keep lab assets separate for a specialized disposal process.
What Is the Biggest Mistake Labs Make During Disposal?
Hands down, the single biggest—and most expensive—mistake we see is failing to create a detailed inventory before anything leaves the building. A clear, itemized list is your entire defense. It's the foundation of your chain of custody.
Without that inventory, you have zero proof of what was picked up, what was recycled, or which specific hard drives were sanitized.
An inventory isn't just a "nice-to-have." If an auditor shows up six months or two years down the line asking for proof of data destruction for a specific machine, that list is the only thing standing between you and a massive compliance headache.
How Do I Choose a Qualified Disposal Vendor?
Finding the right partner is everything. You're not just looking for a truck and a couple of guys to haul stuff away; you're looking for a partner in compliance. A truly qualified vendor should offer nationwide service, ensuring consistent standards no matter where your facilities are located.
When you're vetting a vendor, here’s what you should be asking for:
- Key Industry Certifications: Do they hold an R2 (Responsible Recycling) or e-Stewards certification? These aren't just fancy badges; they prove a commitment to environmental and data security standards.
- Proof of Insurance: Don't be afraid to ask for their certificate of insurance. They need to carry enough liability coverage to protect your organization if something goes wrong on-site.
- Real Documentation: A qualified partner will provide itemized Certificates of Disposal and Data Destruction that match your inventory list serial number for serial number.
- In-House Logistics: Do they use their own trucks and their own trained technicians? Subcontractors can introduce security risks and scheduling nightmares. A company that controls its own nationwide logistics is a much safer bet.
- Experience in Your World: Ask for references or case studies. You need a team that knows how to work in an active lab, hospital, or research facility without getting in the way or causing a disruption.
Choosing a vendor who checks these boxes means your lab laboratory equipment will be handled securely, professionally, and by the book.
Ready to clear out your surplus lab equipment with a trusted, compliant partner? Scientific Equipment Disposal offers specialized pickup, certified data destruction, and sustainable recycling services for organizations across the Atlanta area and nationwide. Get a free quote and schedule your pickup today!