A Guide to the Sterilization of Equipments for Labs and E-Waste Nationwide

Sterilization isn't just about wiping things down. It's the absolute elimination of all microbial life—bacteria, viruses, fungi, and even tough-to-kill spores—from your lab instruments and electronics. Before any piece of equipment leaves your facility for transport, recycling, or disposal, this step is non-negotiable. It’s what stands between responsible operations and a major safety incident, whether your lab is in a bustling city like Atlanta or a research park in a quiet town.
This process is far more involved than simple cleaning. It's a critical protocol designed to neutralize biohazards and protect communities across the country from potential exposure.
Why You Can't Afford to Skip Equipment Sterilization
In any lab or healthcare setting, from a small biotech startup in a local innovation hub to a major national research institute, proper sterilization is the bedrock of safety and compliance. Think of it as the first line of defense in your disposal plan—a firewall against liability, regulatory fines, and public health disasters.
Failing to properly decontaminate equipment before it goes out the door can have massive consequences. Forgetting to sterilize even one piece of equipment can lead to:
- Hefty Regulatory Fines from agencies like OSHA and the CDC, which have zero tolerance for mishandling potentially infectious materials nationwide.
- Biohazard Exposure for waste handlers, recyclers, and the public. A discarded machine can quickly become a vector for disease, regardless of state lines.
- Data Breaches from unsecured electronics, putting sensitive patient or research data at risk and inviting HIPAA violations and reputational ruin.
- Environmental Contamination if biological agents aren't neutralized before they hit the waste stream, affecting local ecosystems.
The Real-World Risks of Cutting Corners
Imagine a university lab anywhere in the US getting rid of old centrifuges. Without thorough sterilization, residual biological samples could expose sanitation workers to dangerous pathogens. Or picture a hospital tossing out old patient monitors. If those internal hard drives aren't securely wiped and physically destroyed, confidential patient data could easily end up in the wrong hands, a risk every healthcare facility faces.
These aren't just hypotheticals; they're real risks that facilities like yours face every single day, no matter your location. Proper sterilization is your primary defense.
The global market for medical device sterilization was valued at USD 15.65 billion in 2025 and is expected to hit USD 28.93 billion by 2033. A huge driver of this growth is the fight against hospital-acquired infections (HAIs). The U.S. alone reports 1.7 million cases each year, with many linked directly back to contaminated equipment.
It's More Than Just a Wipe-Down
It's absolutely essential to understand that sterilization goes way beyond cleaning or disinfecting. Cleaning removes visible dirt, and disinfection reduces the number of microbes, but neither can promise to kill highly resistant bacterial spores.
True sterilization relies on validated methods—like high-pressure steam (autoclaving), chemical gases, or radiation—to achieve a complete kill. This isn't just a matter of semantics; it's a critical distinction for safety and compliance. Part of this process involves knowing what you're dealing with, and that means understanding the warnings. If you need a refresher, check out our guide on toxic hazard signs to better prepare your team.
Ultimately, whether you run a small clinic in a specific state or manage a national network of labs, a robust sterilization protocol is fundamental. It protects your people, the community, and your organization's reputation. It's about doing the right thing and covering your bases.
Choosing the Right Decontamination Method for Your Equipment
Picking the right way to decontaminate your equipment isn't just a box to check—it's a critical decision. Get it wrong, and you could easily destroy a six-figure microscope, fry sensitive electronics, or worse, fail to neutralize the very biohazards you’re trying to eliminate.
A method that’s perfect for stainless steel tools can be a complete disaster for plastics or complex circuit boards. Whether you're managing a single local lab or coordinating disposals across multiple states, understanding these differences is fundamental to keeping your facility and personnel safe.
High-Temperature Sterilization: The Power of Steam
When most people think of sterilization, the autoclave is what comes to mind. It's the workhorse of the lab for a reason. Using high-temperature, pressurized steam, it effectively kills all microbial life, including tough-to-kill bacterial spores. It’s reliable, effective, and pretty cheap to run.
For any durable, heat-resistant items, the autoclave is the gold standard. We see it used constantly for:
- Glassware: Beakers, flasks, and petri dishes are perfect candidates.
- Stainless Steel Instruments: Things like surgical tools and forceps can easily handle the intense heat and pressure.
- Liquids and Media: Labs frequently use autoclaves to sterilize culture media and other solutions.
- Certain Plastics: Only specific heat-tolerant plastics, like polypropylene and polycarbonate, should ever see the inside of an autoclave.
But the very power that makes an autoclave so effective is also its biggest weakness. The intense heat and moisture will absolutely destroy delicate electronics, melt most common plastics, and corrode certain metals. Never, ever put a laptop, server, or sensitive diagnostic instrument in an autoclave. It's a surefire way to turn valuable equipment into scrap metal.
Low-Temperature and Chemical Methods for Sensitive Items
So, what do you do when intense heat is off the table? This is where low-temperature and chemical methods come in. These are absolutely essential for decontaminating electronics, delicate instruments, and any heat-sensitive plastics before you can dispose of them.
Imagine a hospital in a major city needs to decommission an entire room of IV pumps and patient monitors. These devices have been in a clinical setting, so they're potentially contaminated, but they're also full of delicate circuit boards. This is a perfect job for methods like ethylene oxide (EO) gas or vaporized hydrogen peroxide (VHP).
- Ethylene Oxide (EO): This is a powerful gas that can get into all the nooks and crannies of complex equipment. While it’s incredibly effective, EO is also toxic and requires long aeration cycles to get rid of residual gas. This makes it a complex process that demands very strict safety protocols.
- Vaporized Hydrogen Peroxide (VHP): A much safer alternative to EO, VHP works at low temperatures and simply breaks down into harmless water and oxygen. It's fantastic for sterilizing electronics, medical devices, and even entire rooms. It has quickly become the go-to method for sensitive equipment in hospitals and pharmaceutical labs nationwide.
While traditional steam sterilization still holds a 34% market share globally, low-temperature methods are catching up fast. Hydrogen peroxide vapor, for instance, is growing at over 10% CAGR precisely because it’s perfect for sensitive electronics. The need for proven methods is clear—improperly sterilized devices contribute to 80% of hospital-acquired UTIs, BSIs, and pneumonias. This is why sticking to FDA-approved methods like VHP is so important. You can dig into more data on sterilization equipment trends to see the impact.
Surface Decontamination: A Limited but Useful Tool
What about something like ultraviolet (UV-C) radiation? UV-C light is great for zapping surfaces in a biosafety cabinet or for disinfecting air and water. It works by scrambling the DNA of microorganisms so they can't reproduce.
But UV-C has one huge weakness: it only works on surfaces it can directly see. It can’t penetrate materials or even get around small shadows.
Key Takeaway: UV-C is a helpful tool for reducing the bioburden on a surface, but you should never rely on it as a terminal sterilization method for equipment disposal. An instrument with complex parts or internal components will not be fully sterilized by UV light alone.
The table below breaks down which methods work best for different types of equipment you might be dealing with.
Sterilization Methods Suitability by Equipment Type
| Method | Best For | Not Suitable For | Key Consideration |
|---|---|---|---|
| Autoclave (Steam) | Glassware, stainless steel tools, surgical instruments, heat-resistant plastics (polypropylene), liquids. | Electronics, most plastics, heat-sensitive instruments, corrosion-prone metals. | Fast, inexpensive, and highly effective, but high heat and moisture will cause damage to sensitive items. |
| Ethylene Oxide (EO) Gas | Complex medical devices, instruments with long lumens, plastics, electronics, items sensitive to heat/moisture. | Liquids, items that can't withstand a vacuum. | Highly effective penetrator, but gas is toxic and carcinogenic. Requires long aeration times (8-12 hours) to remove residue. |
| Vaporized Hydrogen Peroxide (VHP) | Electronics, medical devices, endoscopes, sealed enclosures (isolators, BSCs). | Items made of nylon, copper, or brass. Materials that absorb H2O2. | Safer than EO, with no toxic byproducts (water and oxygen). Shorter cycle times and excellent material compatibility. |
| UV-C Radiation | Exposed surfaces in biosafety cabinets, air and water disinfection, surface-level decontamination. | Complex equipment with internal parts, shadowed areas, porous materials. | Line-of-sight only. It's a surface disinfectant, not a sterilant for complex items intended for disposal. |
Choosing the right method comes down to understanding your equipment's material and complexity. Always check the manufacturer's guidelines, but this table gives you a solid starting point for making a safe and compliant decision.
This flowchart illustrates the choice you're facing: handle sterilization correctly, or open your organization up to major risks.
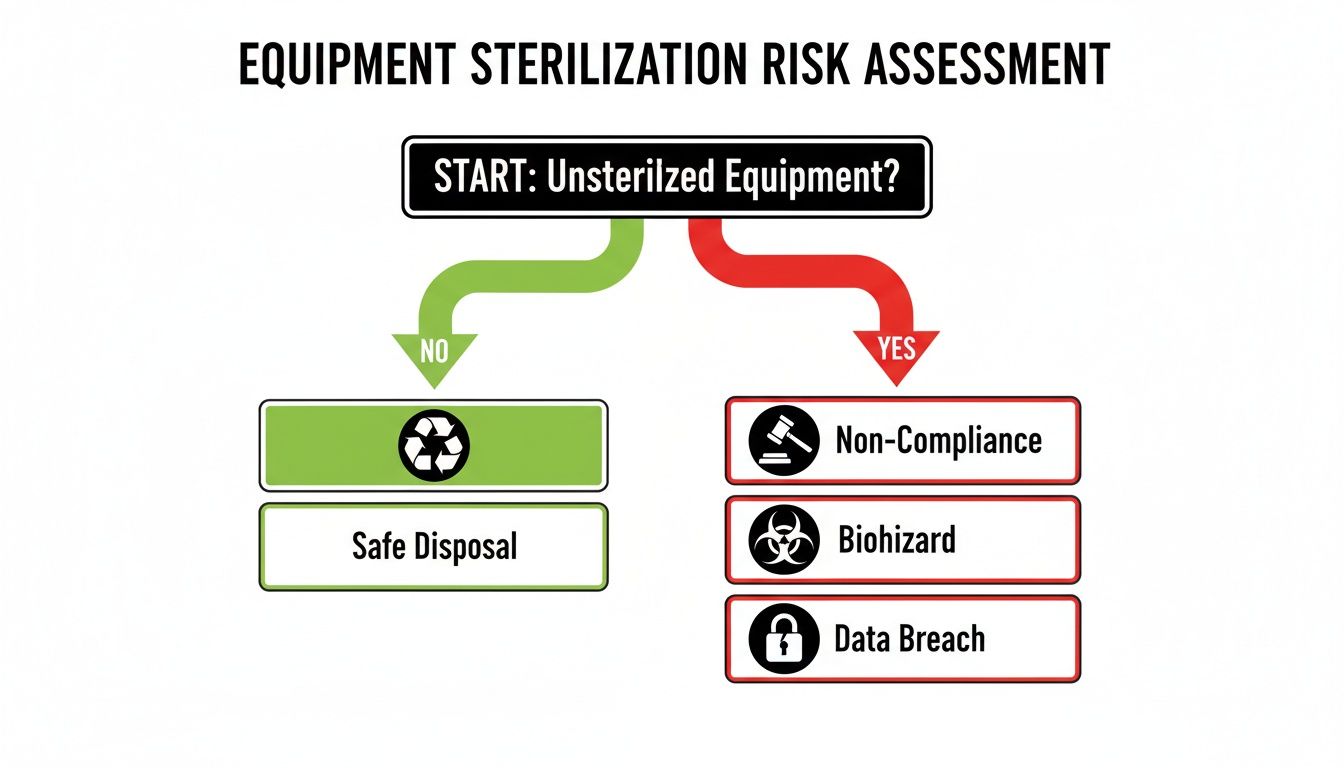
As you can see, cutting corners on sterilization isn't an option. It opens the door to serious legal, financial, and safety consequences. Making the right choice here protects your people, your organization, and ensures every piece of equipment is disposed of responsibly, whether it's a local pickup or a nationwide service.
Validating Sterility and Ensuring Regulatory Compliance
Running a sterilization cycle is just the start. The real work—and the part that keeps auditors happy—is proving that the cycle actually worked. This process is called validation.
Think of it like this: just saying you sterilized a piece of equipment is like telling a professor you studied for the final exam. Where's the proof? For labs anywhere in the US, that proof has to be documented, verifiable, and ready for inspection at a moment's notice.
This isn't just about ticking a box. It's a fundamental requirement from national regulators like the CDC, OSHA, and the EPA. Your ability to prove sterility is your best defense against non-compliance fines and serious liability issues.
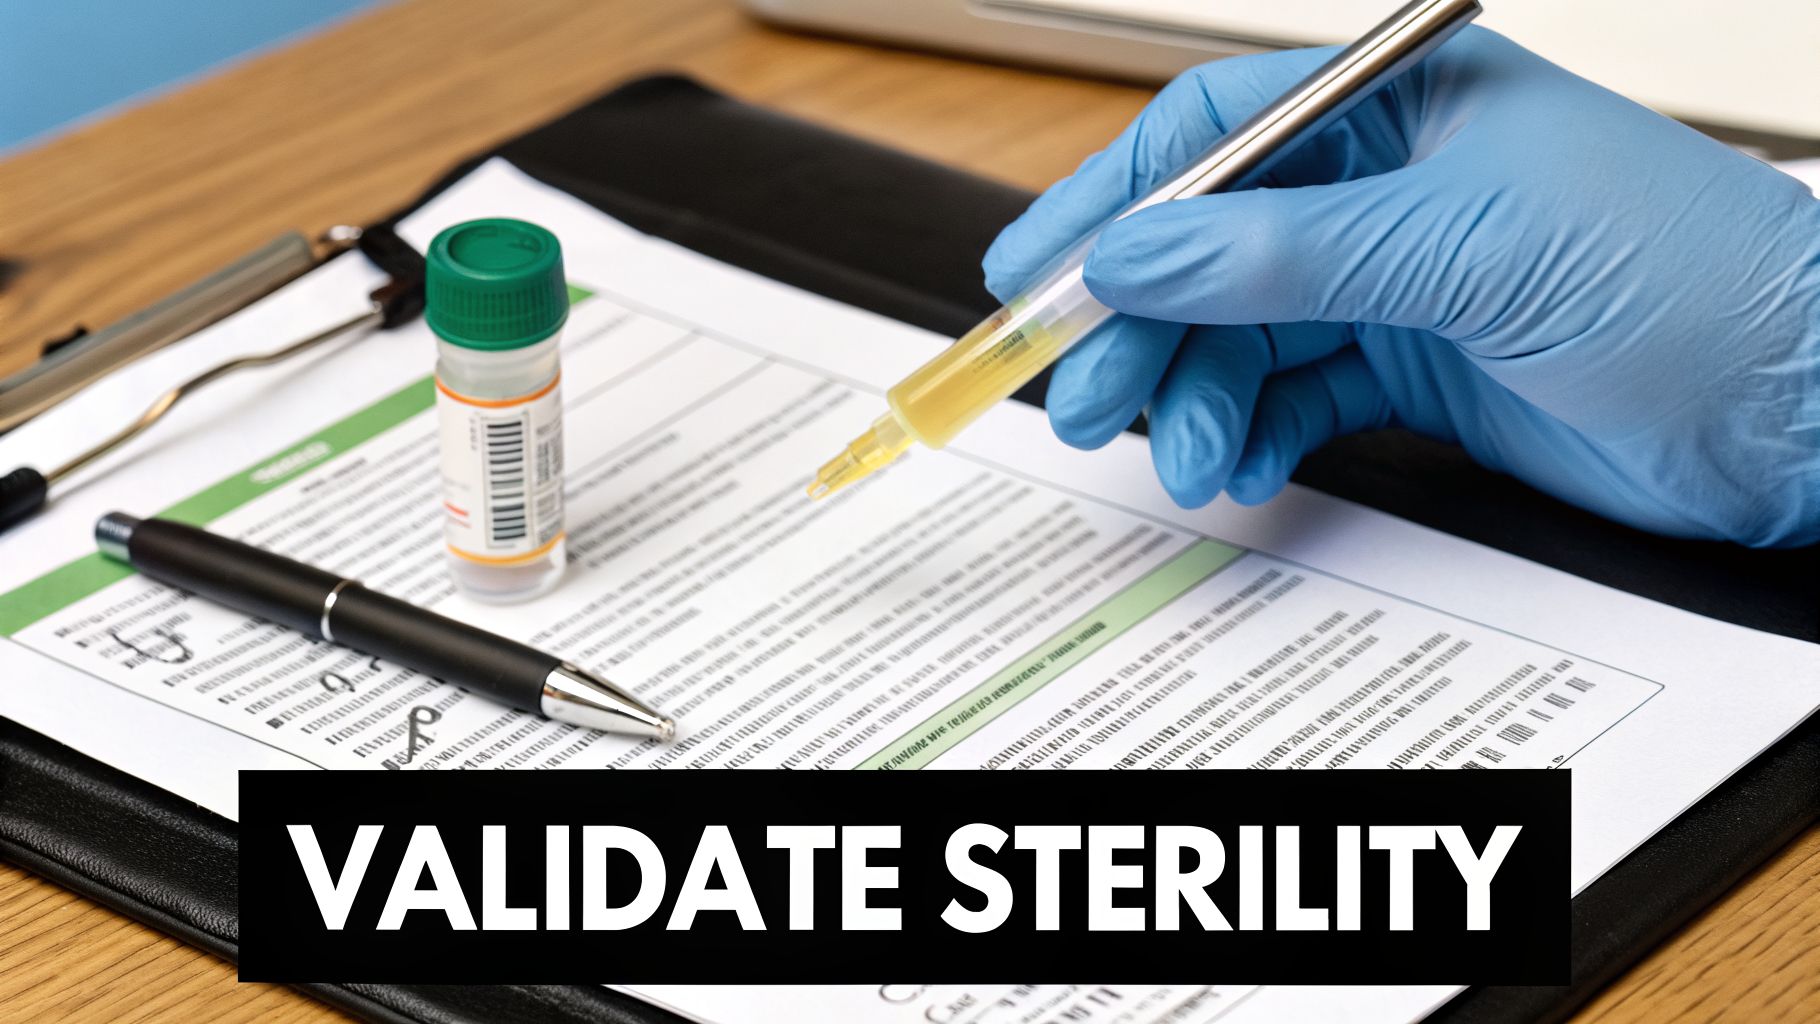
The Tools of Validation: Chemical vs. Biological Indicators
To prove a sterilization cycle was successful, you need the right tools. They primarily fall into two buckets: chemical indicators and biological indicators. Each one gives you a different piece of the validation puzzle.
A chemical indicator (CI) is your first-line check. It’s the familiar autoclave tape that gets dark stripes after a run. This tells you the equipment was exposed to the right conditions, like high heat or a specific gas. But here's the catch: it doesn't actually prove that any microorganisms were killed.
For the definitive answer, you have to use a biological indicator (BI). These are the undisputed gold standard in the industry. A BI contains a sample of highly resistant bacterial spores, usually Geobacillus stearothermophilus. After you run a sterilization cycle, you incubate the BI. If there’s no growth, you have scientific proof that the cycle was lethal and your equipment is truly sterile.
The stakes are incredibly high. Healthcare-associated infections (HAIs) cause an estimated 1.7 million U.S. cases and 99,000 deaths every year. With around 80% of these infections tied back to medical devices, it's easy to see why BIs have become the non-negotiable benchmark for verifying sterility. As you can see in research on the global sterilization market, the push for this level of validation is only growing stronger.
The Critical Role of Record-Keeping
Here’s a hard truth: validation without documentation is completely worthless in an audit. Your record-keeping is the backbone of your entire sterilization program, and every single cycle has to be logged with absolute consistency.
These logs are your primary defense. They provide a clear history of every sterilization event and are crucial for limiting your facility's liability. A complete log for each cycle must include:
- Date and Cycle Number: For easy tracking and identification.
- Load Contents: A general description of what was in the cycle (e.g., "Assorted Glassware," "Centrifuge Rotors").
- Cycle Parameters: The exact temperature, pressure, and time achieved.
- Operator's Name or Initials: To show who was responsible for the run.
- Indicator Results: The outcome for both the chemical indicator (pass/fail) and the biological indicator (growth/no growth).
Compliance Beyond Biohazards: Data Sanitization as 'Sterilization'
For any facility that uses modern electronic equipment, the idea of "sterilization" has to expand beyond microbes. It must also include digital data. Under national rules like HIPAA, wiping hard drives and other storage media is a parallel decontamination process that’s just as important.
Failing to properly sanitize data before disposal is the digital version of a biohazard leak. It can expose sensitive information, trigger massive fines, and cause permanent damage to your organization's reputation.
This is exactly why certified data destruction is a non-negotiable part of the equipment lifecycle. Just like you need a log showing a biological indicator had no growth, you need documented proof that data was destroyed beyond recovery. A professional service provides this with a Certificate of Destruction, closing the compliance loop for both physical and digital hazards.
In-House Decontamination vs. Calling in the Pros
Figuring out whether to handle equipment decontamination yourself or to bring in an expert is a constant balancing act. It comes down to weighing your lab’s capabilities, the costs involved, and, most importantly, the level of risk you're willing to take on.
For many facilities, running routine sterilization in-house is just part of the daily grind, and that’s perfectly fine. But some situations should immediately set off alarm bells, telling you it’s time to call a professional for local or nationwide service. Knowing the difference is key to a smart, safe, and compliant disposal strategy.
When DIY Sterilization Works
Running your own autoclave for glassware, stainless steel instruments, or growth media is standard operating procedure for most labs. If your team is properly trained and you’ve got the right, validated equipment for the job, handling it yourself is often the most efficient path forward.
This in-house approach is a good fit when:
- The items are known to be free of high-risk biological agents.
- Your team has documented training on how to operate your sterilization equipment safely.
- You have validated autoclaves or other systems with up-to-date maintenance logs.
- The volume of materials is something your current staff and equipment can handle without getting overwhelmed.
For these everyday tasks, a DIY process that is well-established and properly documented is both practical and cost-effective.
Red Flags: When to Call a Professional Service
While a good in-house process is crucial, some jobs bring a level of risk and complexity that’s best left to a team with specialized experience. These are the moments when a professional service isn’t just another vendor—they become a critical partner in keeping your facility safe and compliant, wherever you are located.
1. High-Risk Pathogens are Involved
This is non-negotiable. Any equipment coming out of a Biosafety Level 3 (BSL-3) or Biosafety Level 4 (BSL-4) lab needs specialized handling. The risk of exposure to dangerous pathogens is just too high for standard protocols. Professional services have the engineered controls, validated processes, and specialized transport designed specifically for these high-containment materials.
2. You're Decommissioning an Entire Lab
Shutting down a whole facility is a huge project. The sheer amount of equipment—from centrifuges and incubators to fume hoods and electronics—can easily overwhelm an in-house team. A professional service can manage the entire workflow, from de-installation and packing to logistics and final disposal across the country. To get a better sense of what's involved in these complex projects, you can learn more about lab equipment decommissioning services here.
3. The Equipment Contains Sensitive Data
This is a big one. Any piece of electronic equipment that holds Protected Health Information (PHI) or sensitive research data is governed by strict national rules like HIPAA. Just wiping a hard drive isn't enough. A certified data destruction service will either use multi-pass wiping software or physically shred the media, giving you a Certificate of Destruction as proof of compliance.
4. You Don't Have the Right Equipment or Resources
If your autoclave is down for maintenance, isn't validated, or simply isn't suitable for the item you need to get rid of (like a large piece of electronic equipment), calling a professional is your only safe bet. Trying to sterilize something with the wrong gear is a fast track to a compliance failure and a major safety risk.
Bringing in a professional for these high-stakes scenarios turns a logistical nightmare into a managed, compliant process. You're effectively transferring the risk from your organization to a partner that is fully equipped to handle it—a huge benefit whether you're in Atlanta or managing labs across the country.
Ultimately, a professional partner gives you peace of mind. They ensure every step of the sterilization of equipments and disposal is handled correctly, documented thoroughly, and done safely, protecting your organization from future liability.
How to Prepare Your Equipment for Professional Disposal
So you've scheduled a pickup. Great. A little prep work on your end makes a huge difference, ensuring the process is quick, safe, and totally seamless for your team and ours. It's the final, crucial step in your compliance journey.
Whether we're meeting you for a local pickup or coordinating a pickup from across the country, these are the exact steps we tell our clients to follow. This is how you get your lab and electronic equipment ready for its final hand-off, making sure all the sterilization of equipments you performed is documented and ready to go.
Label Everything—No Exceptions
If there's one thing you can't skip, it's proper labeling. I've seen it firsthand—missing or vague labels create confusion, slow things down, and can even become a safety hazard. Every single piece of equipment needs a clear tag showing its decontamination status.
We provide specific tags just for this. When our technicians arrive, they can see exactly what they're dealing with at a glance.
- Green Tag: This tells us the item is fully sterilized and decontaminated. It's good to go.
- Yellow Tag: This signals that the item needs professional decontamination, which our team will handle at our facility.
- Red Tag: This is for equipment with known biohazards. It flags the item for specialized handling from the moment we touch it.
This system works. It cuts out the guesswork and keeps our team safe and efficient, whether we’re at a university lab in downtown Atlanta or a private R&D facility two states away.
Pro Tip: Don't just slap the label anywhere. Stick it in a highly visible spot that won’t get covered up when equipment is moved or stacked. For big machines, I always recommend using two labels—one on the front and one on the side. You can't miss it.
Secure and Consolidate Small Items
Loose items are a nightmare for logistics and safety. We've seen it all—small glassware, pipettes, and random supplies getting lost, shattered, or even causing injuries because they weren't packed right.
Before we arrive, please take a moment to gather all these small items. Group them together in sealed, puncture-proof containers. Simple, sturdy cardboard boxes or plastic totes are perfect.
This small step does two things: it prevents breakage and massively speeds up the pickup. A few well-packed boxes are infinitely easier and safer for our crew to manage than hundreds of tiny individual pieces.
Prepare an Inventory for Data-Bearing Devices
With electronic equipment, it's not just about the physical hardware. Data security is non-negotiable, especially for devices that held sensitive research data, patient information, or intellectual property.
You’ll need to put together a detailed inventory of every single asset that has a hard drive or other storage. This list is absolutely critical for our data destruction team.
Your inventory should track these three things:
- Asset Tag Number: Your internal tracking ID.
- Device Type: Simple is best— "Laptop," "Desktop," "Server," "External HDD."
- Serial Number: This is for precise identification and a bulletproof chain of custody.
Handing us this list lets us cross-reference every device when it arrives at our facility. We guarantee that every drive is accounted for, sanitized, or physically destroyed. It’s how you get an unbroken chain of custody for your compliance records. If you want to know what goes into that process, we have an article explaining how to wipe a hard drive completely to DoD standards.
And for any equipment that requires careful handling even after sterilization, this guide on hazmat waste management is a great resource. Following these practices ensures that from on-site prep to final processing, your assets are managed in a compliant and environmentally sound way.
Common Questions About Equipment Sterilization and Disposal
When it's time to retire old lab equipment, the rules around sterilization and disposal can get pretty murky. We get calls all the time from lab managers, IT directors, and compliance officers—both from specific cities and nationwide—looking for straight answers.
We've been doing this for a long time, so we've heard just about every question there is. Here are a few of the most common ones we tackle daily.
Is a Good Surface Wipe-Down Enough for Decontamination?
This is a big one. A lot of people think a thorough wipe-down with alcohol or a bleach solution is all it takes to decontaminate equipment before disposal. While that’s a decent first step for basic cleaning, it is not true sterilization. It absolutely won't pass muster for compliance, especially if that gear came from a BSL-2 or higher lab.
Think about it—surface disinfectants can't possibly reach all the internal nooks and crannies of complex electronics. More importantly, they aren't validated to kill the tough stuff, like bacterial spores. To be completely safe and meet strict national regulatory standards, you need a validated method like autoclaving or professional-grade chemical sterilization.
Expert Insight: Just wiping down the outside of a machine gives a false sense of security. The first technician who opens that "clean" centrifuge for recycling could be exposed to live pathogens, and that creates a massive liability for your organization.
What Kind of Documentation Do I Need to Prove Sterilization?
In the world of compliance, if it isn't documented, it didn't happen. To prove you've done your due diligence, you need to keep a detailed log for every single sterilization cycle. This isn't just good practice; it's essential for any audit.
Your logbook is your official record. Each entry has to include, at a minimum:
- The date and a unique cycle number
- The operator’s name or initials
- All cycle parameters—temperature, pressure, and total run time
- The results from your chemical indicators (like autoclave tape) and your biological indicators (spore tests)
When you hand this job off to a professional service, that burden shifts. You should get an official Certificate of Sterilization or Certificate of Data Destruction, which becomes your verifiable proof that the asset was handled correctly.
Can Sterilized Lab Equipment Just Go in the Dumpster?
We hear this question a lot, and the answer is a hard no. Even if a piece of equipment has been perfectly sterilized, you can’t just toss it in a regular dumpster or send it to the city landfill.
Most lab equipment, especially anything with a circuit board or power cord, is considered electronic waste (e-waste). These devices are full of hazardous materials like lead, mercury, and cadmium that can contaminate soil and groundwater if they end up in a landfill.
Proper disposal means working with a certified e-waste recycler who knows the unique challenges of lab assets. This ensures every component is managed responsibly, protecting both the environment and your organization from the steep legal penalties that come with improper disposal. To see what this final stage looks like, you can learn more about what happens to old laboratory equipment after it leaves your facility. It’s a critical piece of a compliant asset management plan.
Trying to manage the complexities of equipment sterilization and compliant disposal on your own is a huge task. Scientific Equipment Disposal provides specialized services for labs and businesses locally and nationwide, ensuring your assets are handled safely, securely, and sustainably from the moment we pick them up. Let us help you close the compliance loop for good.
Learn more about our services at Scientific Equipment Disposal